Time and again Microsoft has been coming up with innovative solutions to make things easier and streamlined for business professionals. The basic agenda is to organise data in a systematic way so that it can be easily accessed by them. This is especially true for MS Excel.
It wouldn’t be wrong to call MS Excel a goldmine of formulas and tactics to organise any kind of data into the desired format.
Excel is only going to prove advantageous if you are familiar with the basics. Most people find themselves confused between the dynamics of Excel Rows and Columns, refraining from using the software to its potential. Don't be one of them.
Here we have something that can help you learn the dynamics of Excel rows and columns from the inside out. Keep reading to learn more.
What are Rows and Columns in Excel?
Before we get started with how to use rows and columns to your advantage, let’s learn what the difference between a row and a column is.
Know that a horizontal line of cells in Excel is known as a row. Each one has a unique number ranging from 1 to 1,048,576 that marks its identity.
On the other hand, a vertical line of cells in Excel is known as a column. Unlike rows, each column has a unique letter ranging from A to XFD to mark its identity. There are a total of 1,048,576 rows and 16,384 columns in MS Excel 10.
How to Select Several Rows and Columns at a Time
To select several adjacent rows, all you need to do is select a range that includes cells of the cells you wish to select. After that, press “Shift + Spacebar” to select the desired rows.
On the other hand, if you want to select several columns, you need to choose the range including the cells you want to select. After that, press “Ctrl + Spacebar” to select all the desired columns in the sheet.
How to Add or Remove a Row or Column, Both Manually and Using Keyboard Shortcuts
To add a row or column within an Excel sheet, here are the steps to follow.
For Column (Manually)
Step 1: Select any cell within the column.
Step 2: Go to Home.
Step 3: Click Insert.
Step 4: Click Insert Sheet Columns.
For Column (Using Keyboard Shortcuts)
Step 1: Click on the column where you wish to add a new one.
Step 2: Press Ctrl + Shift + + (plus on the main keyboard).
For Row (Manually)
Step 1: Select any cell within the row.
Step 2: Go to Home.
Step 3: Click on Insert.
Step 4: Select Insert Sheet Rows.
For Row (Using Keyboard shortcuts)
Step 1: Click on the row where you wish to add a new one.
Step 2: Press ALT+I+R.
To Insert a Single Row
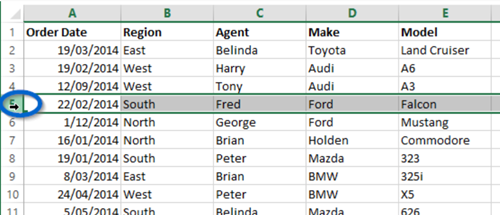
- Left-click on the row number of the row just below where you want to insert the row.
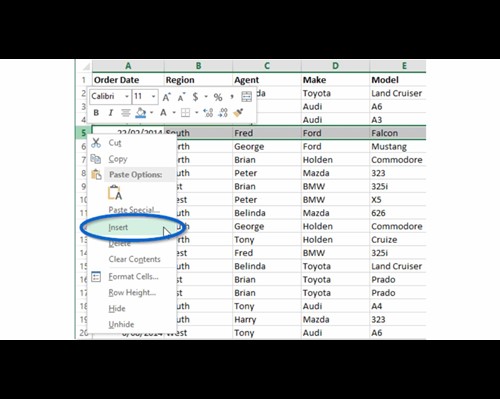
- Right-click on the selected row and click “Insert”.
To Insert a Single Column
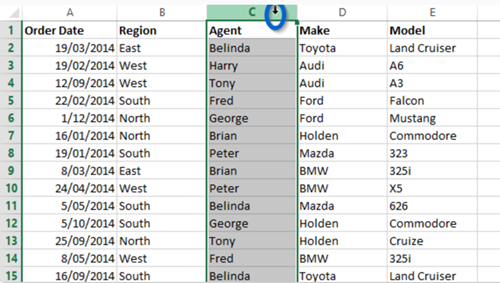
- Left-click on the column letter of the column next to the right, where you want to insert the column.
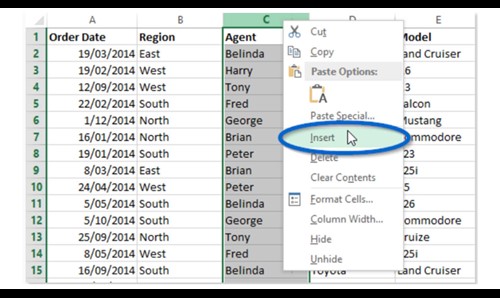
- Right-click on the selected column and then click “Insert”
How to Freeze Rows and Columns Manually and By Using Keyboard Shortcuts
While working with Excel sheets you can Freeze Panes to keep a certain area of the worksheet visible while you scroll to the other part. And here are the steps to follow:
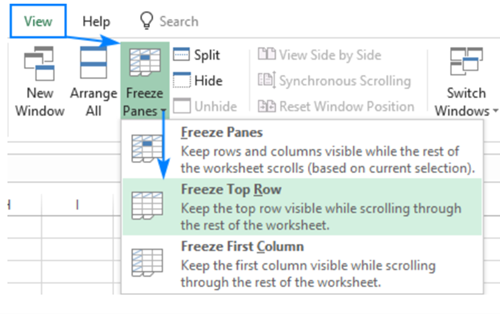
Freezing the First Row
Step 1: Select View.
Step 2: Click on Freeze Panes.
Step 3: Click on Freeze Top Row.
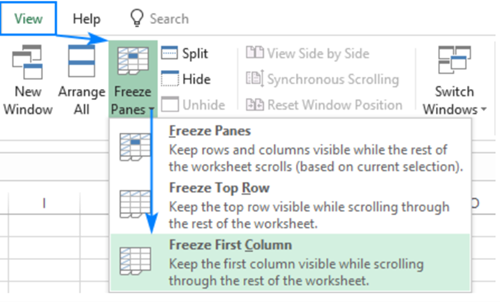
Freezing the First Column
Step 1: Select View.
Step 2: Click on Freeze Panes.
Step 3: Click on Freeze the First Column.
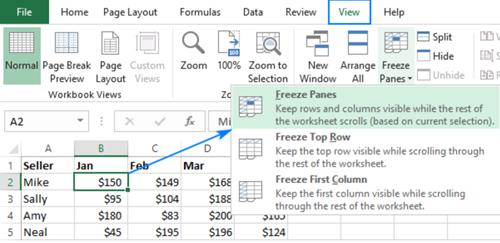
Freezing Rows and Columns In Excel
Step 1: Select the cell below the rows and columns you want to freeze while scrolling.
Step 2: Click on View.
Step 3: Click on Freeze Panes .
Conclusion
Not understanding the dynamics of Rows and Columns in Excel can get on your nerves. But hopefully not anymore. Undertaking Excel training courses with experts like us can further help you make the best use of the tool. With the above-mentioned basics of Excel Rows and Columns, you can easily create worksheets as per your requirements and organise data accordingly. If you are interested in learning this powerful tool, you can check our Beginner, Intermediate, Advanced, and Expert-level courses.

 Australia
 New Zealand
 Singapore
 Hong Kong
 Malaysia
 Philippines
 Indonesia


