SharePoint is a useful tool in your organisation’s tool kit. It’s user-friendly interface makes creating efficient and purposeful sites easy.
The first step to creating a collaboration space in SharePoint is identifying why you need it and what you want to get from it. By having clear goals, how you structure your space and what features you include will be easy decisions. It is also important to get input from the people who will use the sites; they will have a unique perspective on how the space should function.
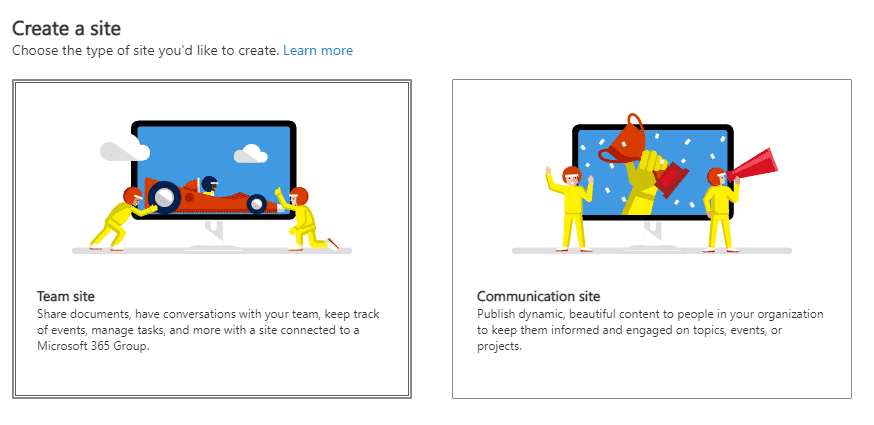
There are two kinds of SharePoint sites with different functionalities. A communication site is used to publish content to keep people within your organisation up to date. Today we will focus on building a Team site. These can be used to share documents, have conversations with your team, keep track of events, and more through a site connected to a Microsoft 365 group.
Use the SharePoint look book to get inspiration on how to format your space, in line with the goals and functionality you identified from your team. Things to consider include how to streamline communication, access to important files, and whether integration with other Office 365 programs would be beneficial. To link up other Office 365 applications, you may need to check that your organisation has the relevant licences and permissions.
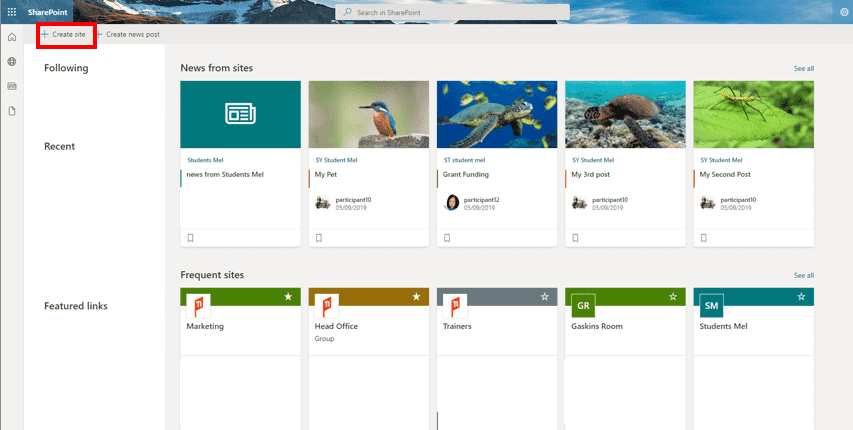
To create the space, open SharePoint. In the top left hand corner, there will be a ‘create site’ button.

Click this to bring up an option between a team site and a communication site. To create a collaboration space, click ‘team site’.

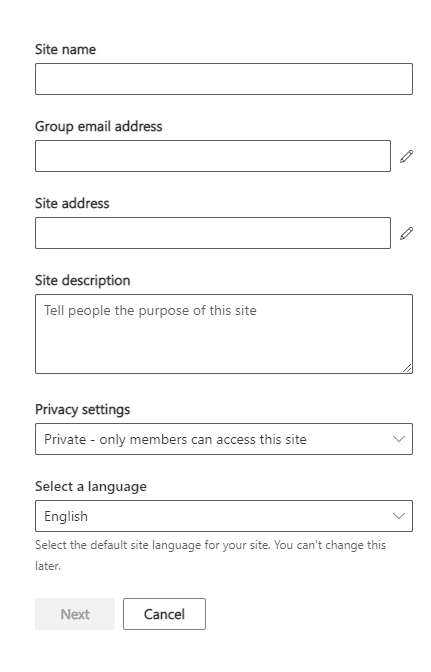
Once you start typing a site name, 5 other fields will appear.

Group email address will allow you to send an email only to those with permissions to view the site. The site address is related to your organisation's SharePoint space. The site description is optional but is a good way to let those within your organisation know what your site is for. Your choice of privacy settings will affect who can see your site, whether that is everyone in your organisation or just those chosen. The ‘select a language’ field is very important as it cannot be changed later. Once you have filled these out, click next.

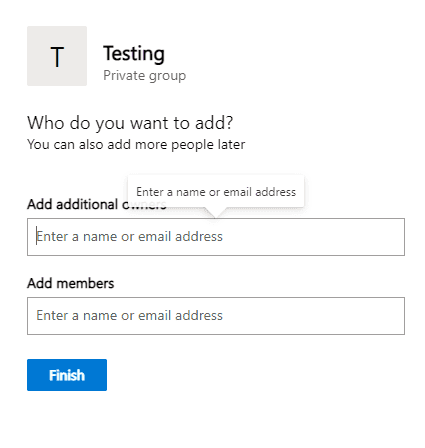
On this page you can add additional owners, who will automatically have permissions to edit the site. Importantly if you have selected the more restricted privacy setting, you can add members who can view your site. This can be changed later as needed.
Once you click finish, your site will be created! You can customise your site with web parts, which are essentially SharePoint’s building blocks. There are many kinds of web parts, each of which have a specific function. Different web parts include the ability to embed a YouTube video or Bing map, integrate a Power BI report or Microsoft planner, and many other functions. For a full list of web parts see here.
In choosing web parts and building your site, remember the function of the site. For further SharePoint training and to take your site to the next level, attend our SharePoint courses. See available dates here.

 Australia
 New Zealand
 Singapore
 Malaysia
 Philippines
 Thailand
 Indonesia


