Power Automate is a powerful tool that can be used to simplify everyday tasks and make your life easier. Part of the appeal of Office365 is how the apps seamlessly integrate with one another, and Power Automate is no exception. The app connects to almost 600 services, including Twitter and some google services.
You can create a flow from existing templates that are published by selected members of the Microsoft community or you can also start from a ‘connector’, a tool developed by Microsoft that ‘speaks’ to the applications used to make the flow work. Connectors are applications that you may want to use in your flows.
When selecting a template, it is important to pay attention to which connectors are being used. There is a difference between outlook.com and Office 365 Outlook (something I figured out the hard way). The outlook.com connector is for the web version of Outlook, generally used for personal accounts. If you are going through your business email in outlook, make sure to use the Office 365 Outlook connector, otherwise, your login will fail. Likewise, there is a One Drive and a One Drive for business connector.
Since Power Automate was first created, Microsoft has updated the way the connectors 'speak' to one another. As a result, some templates are becoming outdated. Once you have experimented with a few templates, try creating your own flow to ensure it is up to date.
A good flow should simplify a task and be an efficient solution. Microsoft has many organizational tools, so ensure the flow you're creating serves a legitimate purpose and won't eventually make more work for you down the track. The flow we are creating today is best for people who use Microsoft planner to organize their 'to-dos'.
This blog will teach you how to create a simple flow that turns flagged emails into tasks in Microsoft planner.
When you first open Power Automate, there will be several templates across the bottom of the screen.
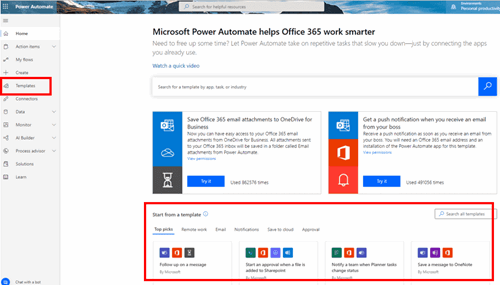
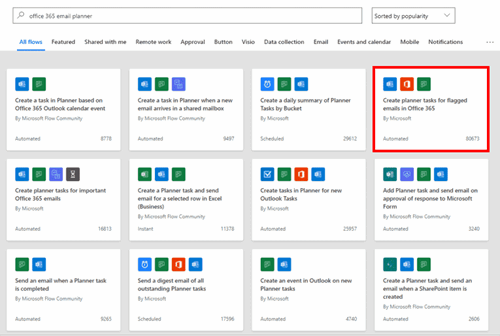
You can browse a limited selection there or access every template through the template ribbon on the left-hand menu. Use keywords in the search bar at the top of the template page to refine your search. I used 'Office 365 email planner'. Today, we will be utilizing the ‘Create planner tasks for flagged emails in Office 365’ template. If you don’t know how to use planner, see our guide to starting out here.
You then need to log in to the services underneath the icons. This is where you will run into trouble if you have selected the wrong template, as you will be unable to log in. Ensure you have the relevant licenses and permissions for the connectors you wish to use.
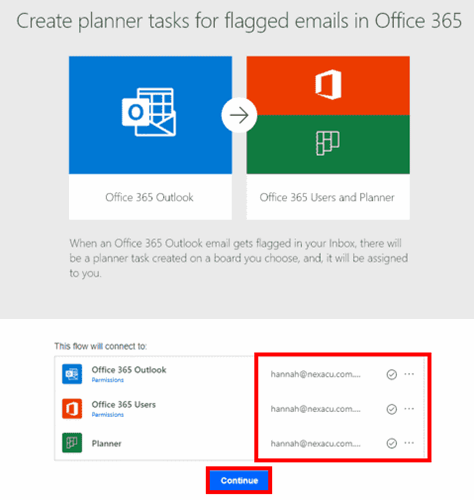
Once you are logged in, click on continue. Power Automate will prepopulate some of the fields based on your login information.
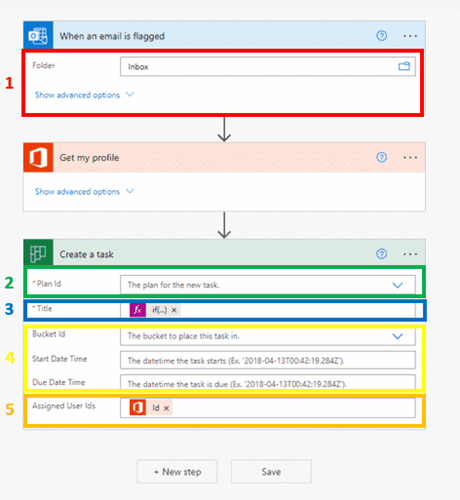
- Under the outlook tab, select the mailbox with the flagged emails that you want Power Automate to draw from. The default is inbox.
- Under the planner tab, the plan ID is the planner you want the new task to fall under.
- The title is what you want the new task to be called. The pre-populated if(…) automatically puts the subject of the email at the start of the name. You can choose from multiple things that change based on the email that you receive. A relevant title could be the subject of the email and who it is from, chosen by selecting ‘from’ from under the outlook section within title. Place a space between the if(...) operator and the 'from' operator to have a space between the subject and sender when the task is named in the planner.
- Bucket ID is the bucket you wish the new task to be placed under. This, as well as the Start and Due date time are optional fields.
- Assigned User Ids will automatically prepopulate with your Microsoft ID
Once you click save, given that there are no errors, you will see a green banner at the top of your screen stating that your flow is ready to go.
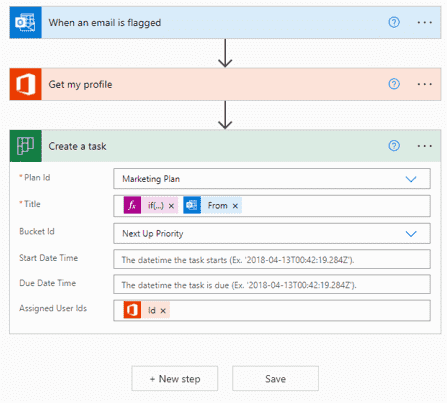
Microsoft recommends you test your flow, so click on ‘test’ in the top right-hand corner. Once you test, you will be told by power automate whether your flow was successful or not. When I originally tested my flow, I made an error in ‘title’. The pre-populated if(…) automatically put the subject of the email at the start of the name, and I didn’t place a space between the two aspects of the title. The new title worked right away, and my flow was done!
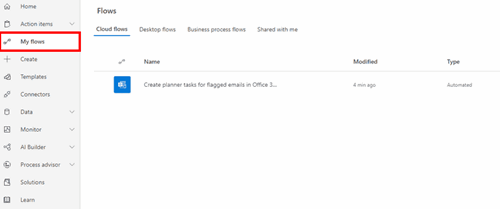
I edited the flow by going through My Flows on the left-hand side menu. You can either go into the flow, click edit in the top right corner, and again click edit in the top right-hand corner ad edit your flow from there. More simply if you hover your mouse over the flow under My Flows and click the pencil icon that will take you directly into the editing screen.
This is a very simple flow, especially since it was made from a template. Templates are an easy way to get started with become Power Automate but can become outdated. It is helpful to know how to build flows from scratch. We cover all areas of Power Automate in our beginner, intermediate and advanced Power Automate courses.
 Australia
 New Zealand
 Singapore
 Hong Kong
 Malaysia
 Philippines
 Thailand
 Indonesia


