Australia
 New Zealand
 Singapore
 Hong Kong
 Malaysia
 Philippines
 Thailand
 Indonesia
The range of products under the Microsoft 365 platform have been put to the limit in the past year and a half with the onset of the coronavirus pandemic. The applications have stood up to the scrutiny and made transitioning to remote work seamless. One of the most useful products is Microsoft Planner, which is widely accessible over iOS, android, as well as through the web; all you need is a Microsoft account.
Knowing how to effectively use Microsoft Planner could mean the difference between met and missed deadlines. Let us help you out with the basics of Microsoft’s productivity software.
To start, open Microsoft planner through your Microsoft 365 account. The default screen will be the planner hub.

1. The Planner Hub
Any plans you are already apart of will appear under ‘recent’. They will also appear as banners on the left hand-side menu. The Planner Hub is essentially the launching screen.
2. My Tasks
Any tasks that have been assigned to you will appear here. You can choose how to group the tasks by plan, progress, due date, or priority. This screen is useful for when you want a full picture of your tasks only, and not a broader view of everyone else’s.


3. New plan
The New plan button enables you to create a new plan. Once you have given the plan a name that is at least one character long and have chosen a privacy option, hit create plan and it will bring the newly named empty plan.


A big selling point of planner and Microsoft in general is how easy their applications are to use.
Buckets are used to break up tasks under specific categories. These could be anything: phases, type, whatever makes the most sense and makes the planner easy to use. To add a new bucket, click ‘Add new bucket’. You can have as many buckets as you want.

4. Add a Task
To add a task, click the ‘Add task’ button. In the initial creation, you can add a name, a due date, and assign someone to the task. To move the task to a bucket, you can either drag and drop the task from the ‘To do’ column to the relevant bucket, or hover over the task and click the three dots in the top right-hand corner. On the menu, choose the ‘move to’ banner and choose the appropriate bucket. You can also add a coloured ‘label’ that could mean anything you need it to, depending on the needs of your team.

Clicking on the task will bring up greater editing options, such as the ability to document progress, assign a priority, add a start date, notes, checklist, comments, and attachments.

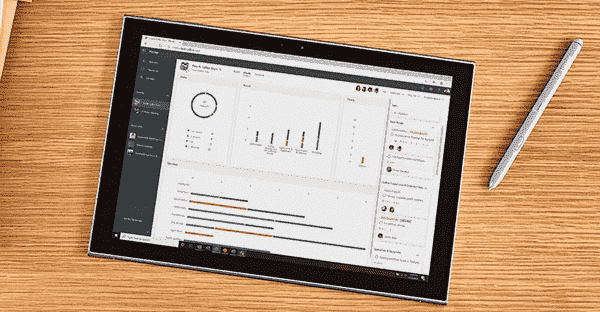
All of this is done in the ‘board’, which is the default screen. You can also view statistics related to your plan under ‘Charts’. This section will present data as to completed tasks as well as tasks grouped by priority.
The ‘Schedule’ section will show a calendar view of your tasks. For this to be possible, your tasks require due or start dates. You can also access more detailed information by clicking on the tasks.


Microsoft planner is easy-to-use. To get the most out of it, customise the different aspects to suit the needs of your team and keep it up to date. To learn the most effective way to use the planner and other key applications in Microsoft 365, come join one of our courses.
View Course Dates