Australia
 New Zealand
 Singapore
 Hong Kong
 Malaysia
 Philippines
 Thailand

SharePoint and Power Automate
SharePoint is a cloud-based collaborative platform that sits within the Microsoft Office suite and can be used to build websites.
SharePoint is used to store, organise, share, and access information from any device.
Simplify the process of implementing your business rules and taking care of your associated business procedures by using Power Automate within SharePoint.
Power Automate is Microsoft's versatile and powerful tool for creating workflows that comes bundled with the Microsoft Power Platform. It has many inbuilt connectors for most of the popular tools in the office/data/automation/communication domain.
There is a cloud service for almost all computing and data-based tasks these days, and Power Automate allows you to connect your different cloud-based services such that they exchange data and work in tandem.
Power Automate also provides a plethora of pre-built, ready-to-use templates for creating workflows that connect different tools and data streams, to get an important job done.
Now, Power Automate can be used to define, edit, and implement your desired workflows, and enforce your business rules. We will demonstrate this by integrating a web forms-based feedback process with SharePoint lists. The creation of a new form is outside the scope of this article, so let's assume you already have a Microsoft form (or a web form that submits to SharePoint) already created.
There is a need to collect and organise all the feedback responses in one place, view them as a whole and extract meaningful inferences and actionable insights from these
responses. All feedback (filled forms) can be added to a SharePoint list, and then you can use Share point’s capabilities to achieve the above.
The stepwise process can be as follows:
1. Login to Power Automate. Your dashboard will show you some pre-built templates. To find the appropriate one, search for "SharePoint" related templates.
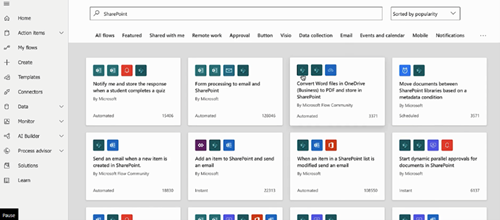
Since there is an existing template to achieve what we need, there is no need to reinvent the wheel.
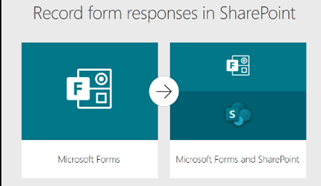
Choose the "Record form responses in SharePoint" template.
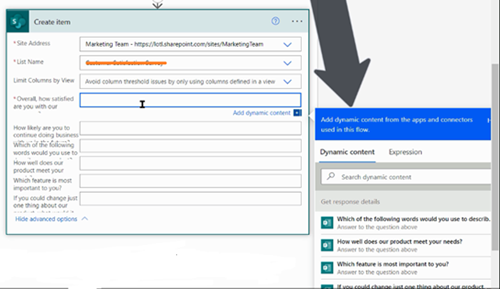
2. Create a new SharePoint list, making sure that all your form fields/questions are inserted as Columns of the SharePoint list.
You can easily do this by clicking on the "Column name" in the SharePoint list, and "renaming" the column, with your question text.
This way, the response to each question/field will be recorded in the list, in that question's corresponding column, in a tabular structure.
Name your list, e.g. My Survey responses list.
3. Next, the template will show you the series of steps/actions that constitute the template, you will need to fill in certain details (e.g. email addresses and file names) for these steps to work.
A green checkmark indicates that Microsoft forms and SharePoint (list) have been connected successfully.
Next, we'll build the flow.
4. You just need to tell the template which form will act as the input, and the destination list to which the responses will be sent.
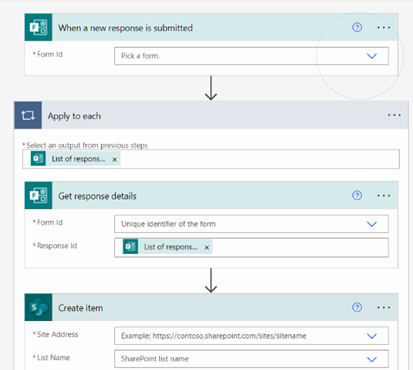
Also, you need to match the columns in the list with the questions in your form, so that the template knows which response goes in which column.
You're done.
Now you can test by submitting a survey response through your form, and you will see your response inside the SharePoint list.
5. You might need to add the old responses to this list, as the workflow we just created will work for future responses only.
To migrate your old responses data, put that data in an Excel sheet, with columns in the excel sheet matching the questions in your form; just like what we did in Step 2.
Create a temporary instant flow (manually triggered) and add a table holding the previous data we've collected using Excel. Make sure that the columns match.
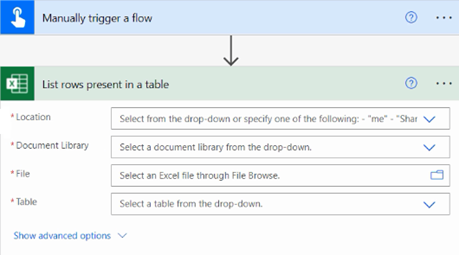
Create - instant cloud flow, select "list rows present in a table", then → choose the location of your source Excel with legacy data, → select your form and select the receiving table inside the form (some forms could have multiple tables, but we have 1 only, so select that table),
As Power automate encounters your previous data, row by row, you can choose what to do with each row.
Here, we need to create a new item with each row, the new item will be a "customer response" row item.
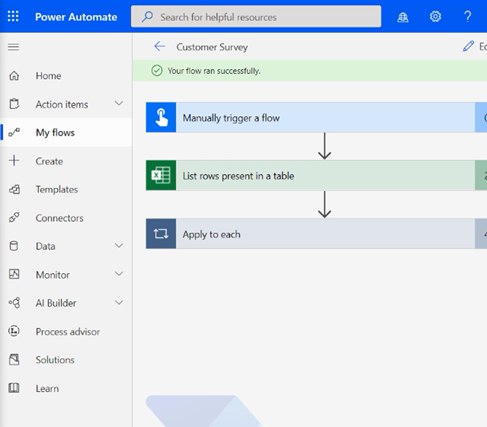
So, add an action "Apply to each", → select "create an item", → map the fields ( fields in previous data and SharePoint list, respectively ), then → choose to save. → trigger it manually
Once the old data is saved, you're ready to start the original flow created.
Now once anyone fills the form, the response data will be sent to the SharePoint list.
Your SharePoint List is now working like an Excel data dump to store the answers to the questions in the forms. This list can be shared via Teams/Outlook etc.
Once you have such a list, it's easy to run analytics on it and gather meaningful insights.
Conclusion
At Nexacu, we are committed to providing high quality training solutions for businesses looking to upskill their workforce. We believe that SharePoint is a valuable tool that can help businesses manage and collaborate more effectively. By undertaking one of our SharePoint courses, you can deepen your knowledge and discover how to unlock the full potential of this powerful platform. From beginner to advanced courses, we invite you explore our comprehensive range of training options to find the right course for your business needs.